Civil war has been raging for two decades in France. When two rival dynasties compete for the duchy of Lorraine, upon the death of its Duke, Burgundian troops are brought face to face with the French-supported army of Rene of Anjou. A few leagues away from the house where Joan of Arc grew up, 12,000 armed men squared off, around midday, on July 2nd 1431. In Medieval Europe, this was a large battle, drawing heavily on the resources of the two enemies. The resounding defeat of Rene d'Anjou had serious consequences. French royal propaganda stifled the Burgundian victory, leading contemporaries, and modern historians, to underestimate its importance. Defeat at Bulgneville, however, could well have sounded the end of the Burgundian principality that played such a key role in late Medieval history.
A story of four families...
Medieval warfare was less a confrontation of states than a confrontation of dynasties, of noble families, whose destiny coincided with more or less intensity with a larger political entity.
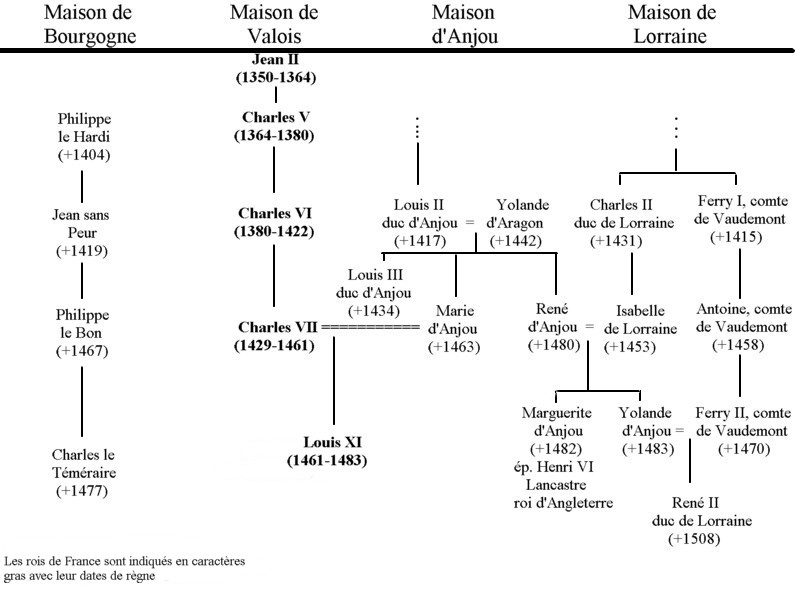
The 12,000 soldiers at Bulgneville were fighting, directly or indirectly, for the interests of four families, all of them "French", and all interlinked. To the left is a simplified family tree for the families of Burgundy, of royal Valois, of Anjou and of Lorraine.
The duchy of Lorraine
The Duke of Lorraine, Charles II, (1390-1431) was initially a client of Louis d'Orléans, head of the Armagnac party. In 1406, however, the two men fell out and Charles II chose to wear the colours of Burgundy. This did not stop him, however, from marrying his eldest daughter and, above all, his heiress to Rene of Anjou in 1420. The Duchy of Bar, neighbouring that of Lorraine, had already been promised to René d'Anjou in the will of another noble.
The Angevines were traditionally close to the ruling Valois family : the French king Charles VII was married to Marie of Anjou way back in 1413. Nonetheless, in order to avoid Burgundian interference in Bar, Rene of Anjou managed to avoid openly supporting the Armagnac cause. Charles II of Lorraine, who had fought in several Burgundian hosts since 1420, had no less a pro-royal stance. In 1429, it was he who held audience with Joan of Arc, and allowed her to pass westwards in order to rejoin the Dauphin.
The success of Joan of Arc, which saw the tide begin to turn in favour of the legitimate king of France, at last allowed Rene of Anjou to openly join the Armagnacs. In September 1429, he was with Joan of Arc during the vain seige of Paris, and, in December 1430, was with the royal army during its vast counter-offensive in Champagne.
René d'Anjou. After Bulgneville, he spent six years in a Burgundian prison, inheriting the kingdoms of Provence and Anjou (1434), and then that of Sicily (1435) during his incarceration. Sicily was lost to the Aragonese in 1442. The Duke was known to posterity as the "Good King René (of Provence)".
War comes to Lorraine
On January 25th 1431, Charles II, duke of Lorraine, died. Already governor of Bar, Rene of Anjou, via his wife, became Duke of Lorraine. The danger for Burgundy was evident, as the map to the left shows. The duchies of Bar (in red) and Lorraine (in green) are slap on the lines of communication between the two halves of the principality of Burgundy.
Philip the Good had to react and, fortunately for him, he had the perfect excuse. Antoine de Lorraine, count of Vaudemont and nephew of the deceased Charles II, and thus his closest male relative, claimed the duchy of Lorraine for himself, stating that Imperial law did not allow inheritance in the female line.
On April 14th 1431, Rene of Anjou sent his letters of defiance to the Count of Vaudemont, and the latter immediately rode to Flanders to seek the aid of the Duke of Burgundy. The War of the Succession of Lorraine had begun, and it would end at Bulgneville.
The Burgundians took a major risk in marching to the aid of Antoine of Vaudemont. Each company sent south-eastwards weakened the defenses of the counties of Artois, and the lands of Picardy, threatened by the wave of French victories in Champagne. Indeed, many of the Duke's Picardy vassals openly refused to march with him.
The campaign in Lorraine
The Duke's army required 16 days to assemble. By May 18th, the Burgundian troops had taken up station between Douai and Cambrai. During this time, Rene d'Anjou had been assembling his own forces, drawing on the feudal levies of Lorraine and of Bar, but also on the vassals of his lands in Alsace and beyond the Rhine, in Imperial territory; Antoine of Vaudemont, who had returned to Lorraine, had of course gathered his own followers, although these were few in number.
Philip the Good could also count on his English allies. The Duke of Burgundy wrote to the English garrisons in the Bassigny, and two captains replied to his call. Louis of Chalons, Prince of Orange, sent a company of Savoyards (Italians) to fight alongside the Burgundians.
René d'Anjou did not stand alone. Robert of Baudricourt, captain of the royal enclave of Vaucouleurs in Lorraine, brought out his garrison. Above all, Charles VII sent a royal army under the command of Arnaud-Guilhem de Barbazan, the governor of Champagne.
On May 22nd, the Burgundian army set out, led by their Marshal Antoine de Toulongeon, and having received six weeks pay in advance. This army followed the road that runs through Guise, Rethel, Suippes, Vitry and Bar-sur-Aube, before arriving in Montsaugeon, south of Langres. From here, the Marshal sent letters and criers to the duchy and county of Burgundy, to call out the Duke's vassals there, ordering their assembly at Montsaugeon for June 17th.
The situation was urgent, for René d'Anjou had invaded Vaudemont as early as May 15th, and was laying seige to Antoine's capital. From their base camp, Rene of Anjou's army launched devastating raids against the county of Vaudemont, laying it to waste.
The Marshal of Burgundy had to force the Angevine army to raise the siege, and in order to achieve this he set out as soon as the Burgundy nobles arrived in his camp. He advanced with caution, wishing, due to the small size of his army, to avoid open confrontation. He did did not enter the duchy of Bar until June 28th.
The Burgundian raiding expeditions sent throughout the duchy of Bar were as brutal as those of their enemies, and before long Rene d'Anjou was forced to raise the siege and set out to meet the Burgundians, in the hope of throwing them out of his lands.
The Marshal of Burgundy, having no doubt underestimated Rene of Anjou's desire to decide the succession of Lorraine once and for all, was caught by surprise. The Angevines advanced with great speed and, on Sunday July 1st, were close enough to the Burgundian positions that the latter felt obliged to deploy near the village of Sandaucourt.
As it happens, Rene d'Anjou was unable to localise his adversary, and the Burgundians were able to withdraw the following morning. The advanced guards of Vaudemont and of Anjou had, however, begun to clash in the surrounding countryside by the time the Burgundian army reached the small village of Vaudoncourt. The Marshal of Burgundy once again ordered his men to deploy and prepare for battle.
History has brought us to the early hours of July 2nd 1431, two kilometres north-east of the village of Bulgneville. In a few hours time, these quiet fields will be filled with the dead and the dying.
The deployment
The Marshal of Burgundy, so the chroniquers tell us, received precious council from one of the English captains, Thomas Gargrave.
With a narrow but steep-sided brook to their backs, the Burgundian forces were deployed on a fold in the otherwise flat land, rising 10m or so above the plain and stretching for a kilometre (see map). The bowmen, placed in the front line, were ordered to dig potholes in front of their positions and plant sharpened stakes, in pure English fighting fashion. The flanks were probably reinforced with men-at-arms, as this was both the English and the Burgundian standard tactic.
All of the men-at-arms were ordered to send their horses to the rear and to fight on foot - on pain of death ! Finally, the army's wagons were used to protect it from being encircled, a tactic that the Burgundians had met recently at the battle of Othee, and had adopted.
Rene of Anjou appeared on the battlefield around 8h00 or 9h00. Seeing the strong Burgundian position, Barbazan counselled him not to attack, but the Duke of Anjou and of Lorraine would have nothing to do with it. His forces were deployed in three "battles", two on foot commanded respectively by Rene and by Barbazan, and another on horseback, under the commandment of Robert de Sarrebruck.
As was customary at this time, both commanders spent the first half of the morning knighting such men as were thought deserving, before they went into combat.
Barbazan, the "irreprochable knight". Captured in 1420, he spent ten years in prison until released by a daring raid. Made governor of Champagne in 1430, he was slain at Bulgneville. Charles VII accorded him the signal honour of burial at St. Denis, amongst the tombs of kings.
The army of Lorraine began to advance around 11h00, to cover the 500m separating it from the Burgundian lines. A shiver of fear swept through the line when the Burgundian artillery opened fire. The Picardy archers sent volley after volley raining down on their enemies, and it seems that Rene d'Anjou's division suffered greatly.
To Rene's right, Barbazan and his men finally reached the gentle slope leading up to the Burgundian position, but a rapid counter-attack caught them by surprise. Worse yet, Arnaud-Guilhem de Barbazan fell to an axe-blow, delivered by an anonymous Burgundian squire or sergent-at-arms. A wave of panic swept through the right flank of the Lorrainer army. Rene d'Anjou's division, unable to progress upslope, had to now receive a fresh Burgundian charge head-on.
The shock was brutal, Burgundian knights crashing into the Lorrainers, who rapidly crumbled, and routed.
Rene d'Anjou fought on, but was unable to stop the flight of his men. To his left, Robert de Saarebruck, rather than trying to attack the exposed Burgundian flank or at least to cover the retreat, fled the battlefield : his knights had not struck a single blow.
The battle of Bulgneville had lasted but a quarter or a half an hour, but the Burgundian pursuit lasted three full hours, and showed little pity. Between 1,000 and 3,000 soldiers of the Angevine army were slain and a 1,000 prisoners taken, among whom Rene d'Anjou himself.
Bulgnéville was no less a massacre than Agincourt has been, and Rene d'Anjou, who had a great destiny before him yet, bore its scars.
Physical scars, on one hand, as he had been wounded on the chin, but above all, psychological scars. The duke of Anjou was to suffer a long period of captivity in a Burgundian prison, in which, even if there was a modest degree of confort, the usual marks of respect between noble knights were lacking. Up until the very end of his life, Rene d'Anjou was always ready to hear the pleas addressed to him by the veterans of Bulgneville, and sponsored several ceremonies of mass for those who had fallen during "la piteuse et dolereuse besoigne à nous advenue prez de Bulligneville".
Recreating the battle of Bulgneville in miniature (DBM).
The terrain for the battle is indicated on the deployment map.
The long, low ridge west of Bulgneville, on which the entire army was historically positioned, should be 75% RGo, the rest GGo. Sources conclude that the countryside was criss-crossed with hedgerows, which I suggest portraying by more areas of RGo, especially along the banks of the streams, as is the case of the "Ruisseau de l'Etang" to this very day. Seeing how the Burgundians explicitly used one of the brooks to secure their rear, the difficulty of the two watercourses should be diced for as per usual, but cannot be "Dangerous".
The village of Bulgneville was fortified in the medieval period.
It is clear that the Burgundians used their baggage waggons to reinforce their defenses, but the sources conflict as to how. Toison d'Or states that they were positioned on the wings (in which case they would be played as TF), the Berry Herald that the Picardy archers were behind them.
Monstrelet gives yet another version, according to which the waggons were placed behind the army, to protect the rear. I suggest the latter solution, represented by fortified baggage placed in a 1x6 group, abutting the brook as illustrated on the deployment map.
Deployment
I suggest that the players be made aware of the historical deployment (via "advice" given by their seconds-in-command), but be free to adopt their own, without however being able to alter their army lists in any way.
Army lists
| Burgundian Army |
| | | | | | | |
| 1er Corps |
| 1 | Irr | Kn | (O) | G | Antoine de Toulongeon | | 20 |
| 3 | Reg | Bw | (S) | | English longbowmen | | 21 |
| 2 | Reg | Bd | (S) | | English knights | | 18 |
| 1 | Reg | Art | (I) | | Coulevrines | | 4 |
| 3 | TF | | | | Stakes and pits | | 6 |
| 8 | TF | | | | Waggon laager | | 8 |
| | | | | | | |
| 18 | | EE's: | 7,0 | | Dem Lvl : | 2,5 | 77 |
| | | | | | | |
| 2ème Corps |
| 1 | Irr | Kn | (O) | G | Simon de Lalaing | | 20 |
| 6 | Reg | Bw | (O) | | Picardy archers | | 30 |
| 6 | Irr | Bd | (S) | | Picardy knights | | 42 |
| 6 | Irr | Bd | (S) | | Burgundian knights | | 42 |
| 3 | Reg | Art | (I) | | Cannons and coulevrines | | 12 |
| 3 | TF | | | | Stakes and pits | | 6 |
| | | | | | | |
| 25 | | EE's: | 22,0 | | Dem Lvl : | 7,5 | 152 |
| | | | | | | |
| 3ème Corps |
| 1 | Irr | Kn | (O) | G | Jean de Vergy | | 20 |
| 1 | Reg | Bd | (S) | | Savoyard knights | | 9 |
| 6 | Irr | Bw | (O) | M | Mounted crossbows | | 30 |
| 1 | Reg | Art | (I) | | Coulevrines | | 4 |
| | | | | | | |
| 9 | | EE's: | 9,0 | | Dem Lvl : | 3,0 | 63 |
| | | | | | | |
| 4ème Corps |
| 1 | Irr | Kn | (O) | G | Antoine de Vaudemont | | 20 |
| 1 | Irr | Bd | (S) | | Imperial feudal knights | | 7 |
| 2 | Irr | Bd | (X) | | Heerban | | 12 |
| 2 | Irr | Ps | (O) | | Heerban | | 4 |
| | | | | | | |
| 6 | | EE's: | 5,0 | | Dem Lvl : | 1,5 | 43 |
| | | | | | | |
| | | | | | | |
| | Total : | 43,0 | | Army Dem Lvl : | 21,5 | 335 |
| Army of René d'Anjou |
| | | | | | | |
| 1er Corps |
| 1 | Irr | Kn | (O) | G | René d'Anjou | | 20 |
| 6 | Irr | Kn | (O) | | Imperial Feudal Knights | | 60 |
| 2 | Irr | Kn | (S) | | French knights | | 24 |
| 10 | Reg | Sp | (I) | | Barrois and Lorrainer militia | | 40 |
| 2 | Reg | Ps | (O) | | Barrois and Lorrainer militia | | 4 |
| | | | | | | |
| 21 | | EE's: | 20,0 | | Dem Lvl : | 7,0 | 148 |
| | | | | | | |
| 2ème Corps |
| 1 | Irr | Kn | (S) | G | Barbazan | | 22 |
| 3 | Reg | Bd | (O) | | Voulgiers de Vaucouleurs | | 21 |
| 13 | Reg | Bd | (O) | | Mercenaries | | 91 |
| 2 | Irr | Bw | (I) | | French archers | | 6 |
| 6 | Reg | Ps | (O) | | Mercenary archers | | 12 |
| | | | | | | |
| 25 | | EE's: | 22,0 | | Dem Lvl : | 7,5 | 152 |
| | | | | | | |
| 3ème Corps |
| 1 | Irr | Kn | (O) | G | Robert de Saarebruck | | 20 |
| 3 | Irr | Kn | (S) | | French knights | | 36 |
| | | | | | | |
| 4 | | EE's: | 4,0 | | Dem Lvl : | 1,5 | 56 |
| | | | | | | |
| | | | | | | |
| | | | | | | |
| | Total : | 46,0 | | Army Dem Lvl : | 23,0 | 356 |
The sources are laconic as to the exact make up of each army. Despite the exaggerations of later sources, Rene d'Anjous army seems to have numbered about 6,000 men. About 1,500 were "lances" (ie. knights) and the other 4,500 were "foot", whose composition is unclear. A contract signed with one of the captains present at Bulgneville says that he must bring "40 men at arms and 20 archers", so we can imagine that 500 of our "foot" are archers. There were also 200 archers with Barbazan. Another 1,500 of Rene d'Anjous footsloggers were city militia. The identity of the remaining 2,300 are left to the imagination.
As for the knights, 200 came with Barbazan and were "French"; there were probably around 200 more in the Vaucouleurs contingent, and the rest would be from Barrois ("French") and Lorraine and the Rhine ("Imperial").
Saarebruck's division was definitely mounted, but whilst Rene d'Anjou and Barbazans' divisions attacked on foot, one source (Toison d'Or) states they dismounted only when under fire. It is thus up to the Angevine player whether he leaves his knights mounted or not, but dismounting should cost only 1 PIP per element, not 2.
The Burgundian army was about 4,000 strong. Picardy sent 800 knights and 600 archers and a strong artillery train, made up of "cannons and coulevrines", whose clamour struck fear into the Angevine army.
200 English knights, and 400 longbowmen, were sent by the garrisons of the Bassigny, as well as a small Savoyard contingent.
Antoine de Vaudemont had rallied certain Lorrainers to his banner, although many were caught in the siege of Vaudemont and could not reach the battlefield. Let's say that he had 500 mounted men with him, which is overly generous. As to the make-up of the contingent from the Duchy and County of Burgundy, no information is given : no doubt knights and crossbows.
Counselled by the English, the Marshal of Burgundy had all his archers dig potholes and plant sharpened stakes before them. These are represented by TF, one per 2 elements, but these can be placed ONLY in front of elements of Bw during deployment.
The knights in the Burgundian army were definitely on foot. According to Monstrelet, the Burgundians wanted to remain on horseback, but the Picardy and English contingents protested, no doubt fearing the flight of their erstwhile allies if the battle went against them. The Marshal finally ordered all men-at-arms to fight on foot, on pain of death. They must therefore be deployed as Bd(S) and cannot remount. They are counted as Bd(S) in the army list. General's elements may, however, remain mounted if the player so wishes, as happened historically.
Victory conditions
The battle lasts 8 turns (longer than historically !).
The Angevines only need to force their enemy to withdraw - a result 6-4 or better is a victory. The Burgundians, however, must decisively defeat Rene d'Anjou or face retreating in order but under pressure : only a result of 8-2 or better is therefore considered a victory.
Any result which is not a victory for one side, is a winning draw awarded to Rene d'Anjou.
SOURCES
The three main sources are :
Enguerrand de Monstrelet (1390-1453), a chroniquer who fought in the Burgundian army, though not at Bulgneville.
Gilles de Bouvier, aka the Herald of Berry (1386-1455), named Herald of Arms of Charles VII in 1418.
Jean Lefèvre de Saint-Remy, aka Toison d'Or, Herald of the Order of the Golden Fleece.
Bernkopf, a German ministrel who composed a poem on the battle.
THE NEXT SECTION SHOULD BE READ BY ANGEVINE PLAYERS ONLY, and the following one by BURGUNDIANS ONLY. Ideally, the scenario should be organised by an umpire, who could eventually play on the Burgundian side.
FOR ANGEVINE PLAYERS ONLY
Special rules for the army of Rene d'Anjou.
1. Rene d'Anjou wishes to sort out the problem of the ducal succession as rapidly as possible. Despite Barbazan's advice, he attacked head-on. To represent this, as of the 3rd turn, the maximum number of PIPs that any command can have is 5; on the 4th turn 4; 5th turn, 3, and so forth, to a minimum of 1. The Burgundian player is not informed of this : PIPs thrown above and beyond the limit are left apparently "unused".
2. The Lorrainer army attacked into the sun, which dazzled them. Use the DBM rules for dazzle.
3. UMPIRED GAME ONLY. Robert de Saarebruck showed excessive caution during the battle, and never attacked the flank assigned to him. The best way to represent this is to have one player command Saarebruck's battle. Recount to this player (alone) the following anecdote (reported by Monstrelet) : "this morning, whilst Duke Rene was waiting and hoping the Burgundians would attack first, a deer ran from the forest. The animal, who stopped between the two armies, struck the ground thrice with his hoof, looked imperiously over the battlefield, and then crashed straight through Duke Rene's division, fearing no man". Tell the player that this is a bad omen, that the Burgundians are up to something, and that it will happen on the 3rd turn. It may or may not make him nervous !
FOR BURGUNDIAN PLAYERS ONLY
Special rules for the army of Burgundy
1. If, at any point, the 2nd Corps throws a 1 for its PIPs, some of the Burgundian knights, forced to fight on foot, have decided to disobey. 1D6 elements of Bd(S) must be immediately removed, and replaced by an equal number of Irr Kn(O) adjacent to the Burgundian baggage. They remain part of the 2nd Corps.
2. UMPIRED GAME ONLY. If a separate player is running Antoine de Vaudemont's command, he does not share in a Burgundian victory unless an element of his own command captures the Duke, by participating in any combat or shooting which leads to the destruction of the element representing Rene d'Anjou.
This reflects the historical consequences of the battle for Antoine de Vaudemont. The Duje of Burgundy was able to purchase Rene from a Burgundian who had the captured him. When the Angevine was finally released from captivity, after 6 years emprisonment, the Duke of Burgundy formally recognised him as Duke of Lorraine,which put Antoine de Vaudemont out of the running. Antoine continued to fight for his inheritance, embroiling Lorraine in another war of succession, before finally having to accept the state of affairs.